We accept OEM & Customization. Low MOQ, Easy To Start. MOQ: 50 PCS.
Wood ceiling fan with light and remote: Installation Tutorial and Features
Product Overview
Our wood ceiling fan with light and remote is a stylish and functional addition to any room. Made from high-quality wood, this fan features a sleek and modern design that complements any décor. With its powerful motor and efficient airflow, this fan is perfect for circulating air and keeping your space cool and comfortable.
Features:
- Wooden Blades: Made from high-quality wood, our fans’ blades are durable and long-lasting.
- DC Motor: Our fan features a powerful DC motor that provides efficient airflow and quiet operation.
- Light Kit: Includes a stylish light kit that provides bright and warm illumination.
- Remote Control: Comes with a convenient remote control that allows you to adjust fan speed, light brightness, and direction from across the room.
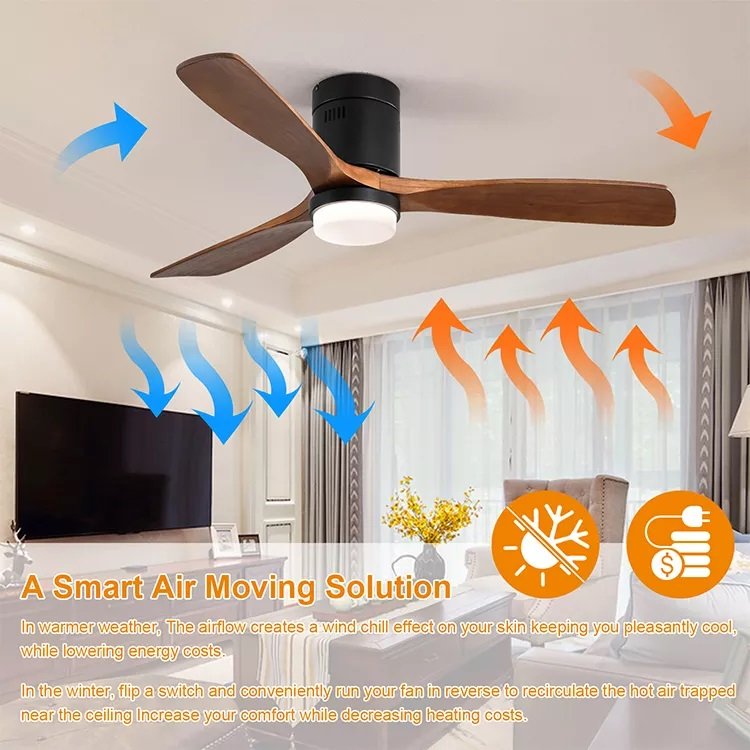
- Reversible Function: Allows you to change the fan’s direction to circulate air in either direction.
- Energy Efficiency: Meets strict energy efficiency standards, saving you money on your energy bills.
Installation Tutorial:
Tools Needed:
- Drill and bits
- Screwdriver (Phillips and flathead)
- Wrench (adjustable)
- Wire strippers
- Electrical tape
- Ladder or step stool
Step 1: Prepare the Ceiling
- Turn off power: Switch off the power to the circuit at the electrical panel. Verify that the power is off using a voltage tester.
- Remove old fixture (if applicable): Take down any existing light fixture or fan.
- Inspect the ceiling: Ensure the ceiling is sturdy and can support the weight of the fan.
Step 2: Assemble the Fan
- Unpack and inventory: Carefully unpack the fan and its components. Check for any damage or missing parts.
- Assemble the fan: Follow the manufacturer’s instructions to assemble the fan. Typically, this involves attaching the blades to the motor housing.
Step 3: Mount the Fan
- Locate the mounting bracket: Identify the mounting bracket that came with the fan. This bracket will be attached to the ceiling.
- Mark the ceiling: Use a pencil to mark the spot where you want to install the fan. Ensure it’s centered and secure.
- Drill pilot holes: Drill pilot holes for the mounting screws.
- Install the mounting bracket: Screw the mounting bracket into place.
Step 4: Connect the Wiring
- Identify the wires: Locate the wires from the fan and the light kit. Typically, these include:
- Black (hot) wire
- White (neutral) wire
- Copper (ground) wire
- Connect the wires: Match the wires from the fan to the corresponding wires in the ceiling. Use wire nuts or connectors to secure the connections.
- Connect the light kit: Connect the light kit wires to the fan’s wiring harness.
Step 5: Install the Fan and Light
- Hang the fan: Carefully lift the fan and hang it from the mounting bracket.
- Secure the fan: Use screws to secure the fan to the mounting bracket.
- Install the light kit: Attach the light kit to the fan according to the manufacturer’s instructions.
Step 6: Test the Fan and Light
- Turn on power: Restore power to the circuit at the electrical panel.
- Test the fan: Use the remote control to test the fan’s operation, including speed and direction.
- Test the light: Test the light kit to ensure it’s working properly.
Step 7: Final Check
- Verify secure installation: Double-check that the fan and light kit are securely attached to the ceiling.
- Check for level: Ensure the fan is level and plumb.
Remote Control Operation:
- Pairing: Follow the manufacturer’s instructions to pair the remote control with the fan.
- Operation: Use the remote control to adjust fan speed, light brightness, and direction.
Tips and Reminders:
- Regular maintenance: Clean the fan blades and light kit regularly to ensure optimal performance.
- Energy efficiency: Use the fan in conjunction with your HVAC system to reduce energy consumption.
- Safety: Always turn off power to the circuit before performing any maintenance or repairs.
By following this installation tutorial and feature guide, you’ll be able to enjoy your new wood ceiling fan with light and remote for years to come.